All your primary listing information can be found and edited under “My Listing Profile”.

Use this to update items potential clients when they click on one of your covers, such as:
- your nickname or the display name
- Optionally, your Country
- your user photo
- your banner photo
- your biographical info or a short blug about you and/or your company
- your website
- Optionally, your general availability (choose from the dropdown)
- Other genres you specialize in
To preview your listing or what clients will see when they click on one of your covers, click the blue “eye” button at the bottom of this screen.
To view your listed covers, go to “My Covers” in your user menu or “My Account” menu

On the left menu (or user menu on mobile) you will be able to view your membership details along with how many covers (also called listings) you have available as part of your membership (the “6” in the screenshot below) and how many covers remaining you can add (the “4” in the screenshot below). The “My Covers” will show a count of how many covers you currently have published for potential clients to view.

The main content of “My Covers” will list all your published covers. You can use the filters to find a certain cover to edit. The eye in the lower left of the cover displays how many times someone has clicked on that cover to view your listing.
There are 3 editing options on the right of each cover, you can delete it, view your profile, or to edit the cover.

To add a new cover
Note: your membership will need to have “remaining” covers more than 0. If not, then you should either unpublish (the power icon) or delete (trash can icon) an existing cover.
Option 1: Click “Submit Genre Cover” from the user menu
Option 2: Click the “+” icon at the top right of the “My Covers” listing page
Add/Edit your cover details
- Select your Genre
- Once loaded, optionally select your sub genre (recommended)
- Optional: information title and description is not displayed to the potential client at this time. It should auto populate your primary listing profile.
- Optional: Additional info. Note: currently this is not used, but may be used in the future for searching purposes only.
- Add your image to the Image Upload. Only 1 image is allowed and should be 600 by 900. If you are replacing an image, then remove it first.
- Confirm you read and accept the terms and condision
- Submit or edit
Follow these instructions to sign up and then by the start of the first of the month your directory profile and Facebook group pre-approval will be activated:
login to the site
Once logged in, click “My Account” -> “My Membership“
Then click “View Membership Options”
Click “Choose” on your Membership choice
Optional: Enter any provided Discount Code:

Check the I agree to the Terms of Use
Click the Checkout with PayPal (it may look like you are making a purchase, but don’t worry, no money will come out until your first due date)
Follow through with the remaining PayPal prompts until you are back on the Cover Directory Website
Last step is to click “Complete Purchase” on CoverDesigerDirectory.com

You should receive an email once completed (check your spam folders) showing the discount.
- please following these steps to update your subscription:
- Login to the Cover Designer Directory
- Click “My Account“
- Under My Membership click “Change“
-
- Using the discount code instructions we sent recently, Continue on at step 5
- Before clicking the “Checkout with PayPal” button, verify the discount code applied. It should look like this:
- Check the I agree to the Terms of Use
- Click the Checkout with PayPal and follow through with the remaining prompts until you are back on the Cover Directory Website
- Last step is to click “Complete Purchase” on CoverDesigerDirectory.com
You should receive an email once completed (check your spam folders) showing the discount.

Please add this special badge to your website, discretely at the bottom is recommended.
Who does this benefit? Both of us. This increases our and your website’s SEO and also verifies you as a quality CDD designer.
On this website, go to “My Account” -> “My Listing Profile” and then look for the “Verified Designer Badge” section. Copy the code section.
Then on YOUR website paste the code using a text editor into the area you want the badge to appear:
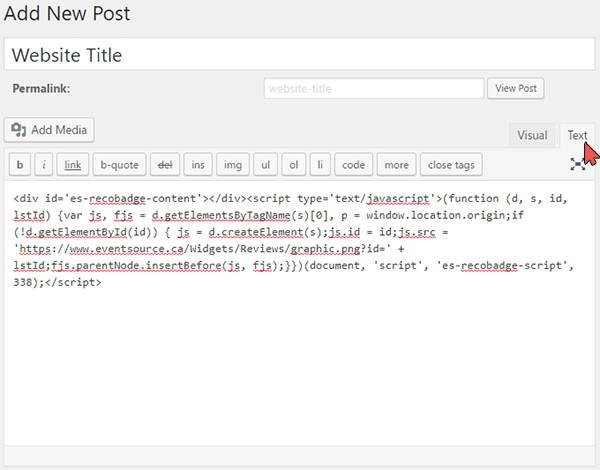
If your website uses WordPress:
- Login to your WordPress Dashboard (most likely http://www.yoursite.name/wp-admin)
- Edit the area you want to include the badge which is typically either in a Post, a Page, or the Footer Widget sections
- For Classic Editor go to the Text Tab to access the source code. Note: if you’re using the Gutenberg theme, navigate to the block where you want to paste the Badge Code and choose Edit as HTML
- Simply paste the badge code there

If your website uses Wix:
Add an HTML embed section from the classic view and then paste the code into the iFrame section. Here is a quick how-to sample video:
No, AI art is new and has some potential legal and ethical challenges to be sorted out, especially for companies hosting the content. Until more certainty becomes available, the Cover Designer Directory will not host or allow AI-generated covers posted on our website or Facebook group.